|
| |||||||||||||||||
|
(Working with Templates) Using a template is probably the simplest, easiest and fastest way to assemble the textures for a track. For the purpose of this section, I will be using the templates created by Sir James. Of course, you can create your own templates, and if you ever make custom textures you will have no choice but to do so. For the time being, however, we will stick to stock textures for which Sir James has provided excellent templates to work with, and, hopefully, you will find them useful as a model should you ever decide to do some custom work of your own. Sir James describes the design of the templates:
Before we begin, let's make sure we're set up for the job.
The first thing we will want to do is go have a look at the template itself. To do that double click the top right corner of the map in the control box. It will look like this.
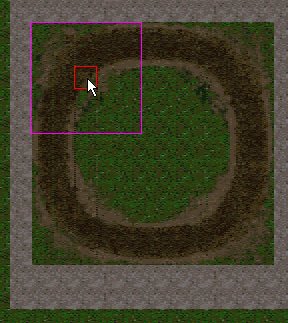
You may have to use the keyboard to center the template in the Traxx window. You should see sections of road and some patches of grass and dirt. We will focus on road sections but the method is the same for all textures.
Click the Texture edit mode
Move the cursor over a part of the track section so that the magenta square frames one corner, like this:
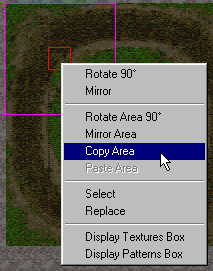
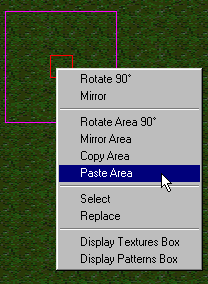
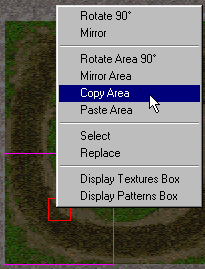
Right click and select "copy area" from the pop up menu.
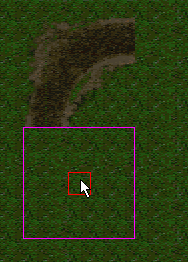
Click the map to move to a location where you want to start building your track. For example:
Right click on the terrain and select "paste area" from the pop up menu.
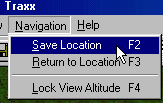
The corner is now painted at the new location. Now go to Navigation on the menu bar and select "save location" to make returning to your track easier.
Double click the map to return to the top right hand corner. You may have to use the keyboard to center the template in the Traxx window.
Again, arrange the cursor over the track section so that the magenta square frames another corner. Right click and select "copy area" from the pop up menu.
Now, select "return to location" from the Navigation menu option to quickly find the first section that you pasted for your track.
Carefully line up the magenta square so that when you do "paste area", the new section will line up with the one that is already there.
Okay, by now you should have the idea. You can continue in this way until your track is complete.
You will have to adjust the size of the "paint mode" area to fit the size of the sections you are copying and pasting. For example, straights, corners, and other ground accouterment. You will probably have to re-save the location using the Menu/Navigation/Save Location or F2 to make your return more exact as you add to your track. After a significant amount of track has been put in place, you can actually use your track as a template too. That is, you can copy and paste areas from nearby sections of your track instead of going back and forth between the template and your track. Rotate Area 90 degrees & Mirror Area These features work exactly the same as they do for a single texture, except that you can now rotate and mirror areas up to 16x16 grid squares in size. See Arranging Textures for details on single texture rotate and mirror.. The only note worthy exception that I can think of is that you might want to make sure you are working with "square" areas when you use the "rotate" feature. For example, a paint mode area of 5x5 or 3x3 is preferable to 5x3 or 2x4.
|