|
| ||||||||
|
(The Side Bars) I don't think there is an actual term "side bars" used in Traxx or anyplace else, but for convenience's sake I will refer to those toolbar controls located on the right-hand side of the Traxx main working window, the ones beneath the Control Bar, as the "side tool bars" or just the "side bars" There are four sets of side tool bars and they are activated by the edit mode buttons on the toolbar. Notice I said there are "four" sets of side bars, but there are actually "five" editing mode buttons. This is because the Terrain, Texture, Course and Ground Box edit modes can be controlled by the simple set of tools that appear on the side of the working area. On the other hand, Object Properties are considerably more detailed and have a special windows dialog box all their own. The present discussion will limit its focus to the side bars and will take up the topic of object properties in a section devoted entirely to that. The Control Bar will receive its most attention in working with templates. Use the terrain tools to make changes to the physical landscape of your track. For example, you can make hills and valleys, cliffs and jumps, or anything you want for your trucking enjoyment.
The terrain side bars appear when you select
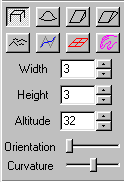
The terrain side bar is composed of three parts, which are: three value boxes, two sliding bars and eight edit buttons. The Width and Height value boxes adjust the size of the area you are working with. These numbers can be entered from the keyboard or by using the scroll arrow buttons. Note that the values you enter refer to the lines in between the grid squares on the terrain - that is where the editing changes occur. You cannot make changes to the middle of a square. Maximum width and height value is 25. Minimum is 1. The Altitude value box adjusts the distance above or below the ground where an editing change will take place. For the Platform, Hill, Ramp, Mound and Random Noise buttons, this value is relative to the terrain (that is, changes are added or subtracted from the existing ground level). For the Plane button, this is an absolute value (that is, it will set the terrain to the value you have indicated). And, for the Smooth and Direct Keyboard buttons, the altitude value does not function. Altitude values can range from zero to 255. The Orientation slide bar controls the direction (east, north, west and south) that the Width and Height area face. This feature is most useful in conjunction with the Ramp and Mound buttons, but it works with them all. You may click and slide the bar with your mouse, or toggle between directions using the tab key. The Curvature slide bar controls the roundness or sharpness of the Hill, Ramp, Mound and Random Noise tools. Sliding the bar to the left will give a more smooth feature, and sliding it to the right will give a sharper, more pointed feature. Play with it to find that in-between spot that you want.
The Platform button The Hill button
The Ramp button
The Mound button
The Random Noise
The Smooth button
The Plane button
The Direct Keyboard For more information on working with altitudes, please see Altitudes. Use the texture tools to make changes to the visual landscape of your track. For example, you can paint in roads, fields, ice-capped mountain peaks, lawns, or anything else you want your track to look like.
The texture side bars appear when you select
This is very easy to use. Checking and unchecking the paint mode box toggles the terrain edit mode on and off. The Width and Height value boxes determine the size of the grid area you will be painting. Minimum value is 1 and maximum value is 16. For more information on painting the terrain, please start with loading textures. Use the course tools to set the path the computer trucks will follow.
The course side bars appear when you select
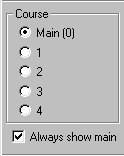
There are five courses that can be set: one main and four extended courses. Clicking a radio button will display the course that you indicate. The "always show main" check box toggles the main course on and off, regardless of which of the other courses you are looking at. For more information on courses, please see courses. Use the ground box tools to add and paint additional terrain elements in your track. For example, you can use ground boxes to create bridges, platforms and walls.
The ground box side bars appear when you select
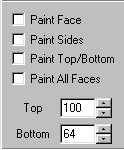
The four check boxes determine what will and what will not be painted when you are using the texture dialog box. The Top and Bottom value boxes determine the altitude for the top and bottom of the ground box. For more info, please see here.
|


