|
| ||||||
|
(Extracting Models & Art) I must apologize for being blunt (and for the grammar I'm about to use), but I find I must state the incredibly obvious so that nothing is taken for granted and there are no misunderstandings this early in the track making process.
There are several ways you can obtain the models and art necessary to make your track. Generally speaking, that is what the entire Guild site is all about. More specifically, you can create custom bins and custom textures as described elsewhere within these pages. However, since the current topic is "starting out" we will restrict ourselves to existing models and art that are already made and waiting to be shaped into your personal vision. Extracting models and art is a two stage process. First, you must use the "view pod file" feature. To do this, go to Files/View Pod file... from the Traxx menu.
Selecting this option will bring up a standard windows dialog box. Browse to the folder in which MTM2 is installed and select the pod file that contains the models and art that you want to use (for a list of stock tracks and their corresponding pod file names, please see here). Now click open. This will load the entire track into Traxx; it will be visible in the Traxx main working window.
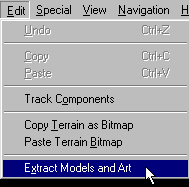
Secondly, you must use the "extract models and art" feature. To do this, go to Edit/Extract Models and Art from the Traxx menu.
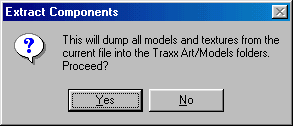
Selecting this option will bring up the following prompt:
Click yes and you will have all the materials necessary to start making your custom add on track for MTM2.
|