|
| |||
|
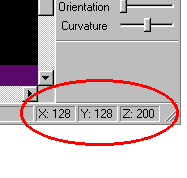
(Getting Around) This section might better be titled, "Knowing where you are in relation to the grid, knowing where you want to go, and figuring out how to get there without really trying," but it wouldn't fit on the menu so I had to settle for "getting around." My apologies if you thought this page was going to tell you all about the keyboard. Here, we are going to talk about a portion of the "status bar," the "control bar," and the "navigation options" on the menu bar. On the previous page, I mentioned that the working area is divided up by lines that form a grid, and that only a small percentage of the grid can be viewed at any one time. This situation can cause problems if your track is larger than a single working window (and most are), or if you want to resume work on a track that was begun on an earlier date, or simply to return to a location that you were working on during the same session but that you had moved away from. Fortunately, Traxx has several features that help make moving and finding your way around quick and easy. The Status Bar Located in the bottom right hand corner of the Traxx window, in the status line, are three values labeled "x", "y" and "z", and they look like this :
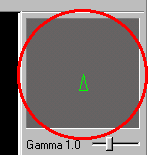
These numbers correspond to the simplest coordinate geometry. "X" = the horizontal axis (west/east grid lines) and "Y" = the vertical axis (north/south grid lines). [note : "z" = the height above ground, but is less important for the present discussion]. The x and y "values" correspond to grid lines. One number = one grid line. On the x-axis, 0 (zero) is located on the far left and the numbers increase as you move to the right until you finally reach 255 at the far right side. Likewise, on the y-axis, 0 (zero) is located on the bottom and the numbers increase as you move upward until you finally reach 255 at the top. The values on the above graphic (x=128, y=128) indicate that the viewing window is at exact dead center of the grid. You will find it useful to glance at these numbers from time to time in order to help you locate those regions in your track that you want to return to again and again. The Control Bar The control bar is located above the edit mode side bars in the upper right hand corner of the Traxx window:
The gray area is a map of the entire grid surface, and the little green triangle displays your location on the grid as well as the direction in which the "camera lens" is pointed. It is usually really helpful to think in terms of a compass. For example, in the above graphic the triangle is pointed upward, or in a north direction. If it is pointed downward instead, then we would think of that as south. Likewise, facing left would be west, and facing right would be east. Another very handy feature of the control bar is that you can double click your mouse anywhere on the gray surface of the map area to jump immediately to that location. So, for example, instead of using an arrow key to slowly scroll from one end of the grid to another, simply double click the other side, and voila, you are there. [Notice, too, that the x and y values in the status bar change as you jump from one spot to another]. Navigation options The "Save Location" and "Return to Location" options under menu/navigation are extremely useful when you require more accuracy than double clicking the grid map can provide. 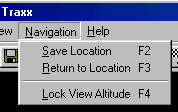 The best way to illustrate the use of this feature is by describing a situation that you might actually do. For example, if you were to create a template from which you would copy and paste the various road sections into your track, you might, like Sir James, place the template in the top right hand corner of the grid (out of the way but easy to find). Okay, suppose your track is located near the center of the grid or somewhere thereabouts. While you are at that spot, press F2 (the hot key for save location). But now you want another section from the template. So, you double click the grid map near the top right corner and scroll to the part of the template you want to use. After you copy the section you want to use, press F3 (the hot key for return to location). Immediately, you are whisked back to the exact spot where you were working.
|