|
| ||||||
|
(Wavefront File Format) Monster Truck Madness 1 & 2, Cart, Fly! and a couple other games made by Terminal Reality use models that are saved in *.bin file format. To speak the obvious, this is where BinEdit gets it's name. You use it to Edit Bins. But *.bin files are not the only model format around. There are quite a number of other formats that are used for other games and/or other modes of display, and these are made using programs like 3D Studio Max or TrueSpace or any number of other 3D rendering programs. Because of these differences, however, file compatibility can become a concern, and in most cases the various formats cannot be interchanged without some sort of conversion process. For BinEdit, this means making use of the Wavefront file format. Wavefront files can be used in at least three ways with Binedit. 1. While working in another 3D program, you can save directly into the wavefront format, if the program supports it, then open the wavefront into BinEdit where you can map textures to it and finally save it as a bin. 2. While working in another 3D program, you can, if the program does not support wavefronts, save in a common model format (e.g.. DXF, 3DS, ASC, etc.) then use a conversion utility to create a wavefront from the other model format, and finally open the wavefront into BinEdit where you can work with it. 3. You can create the verticies and faces for a model in a text editor (like notepad) and then save it as a text file but using the wavefront extension. You may then open your newly but manually created wavefront into BinEdit where you can proceed to map textures to it and otherwise finish it up. In order to understand more about wavefronts, let's review the BinEdit readme.txt: Wavefront/Digital Arts is a very simple format that stores three dimensional models as ASCII files. BINEdit implements only two Wavefront/Digital Arts commands: One. v #x #y #z defines a vertex at coordinates #x, #y, #z
Examples: Two. f #1 #2 #3 or f #1 #2 #3 #4 defines a face using the vertices #1 #2 #3 (triangle) or #1 #2 #3 #4 (rectangle)
Examples:
NOTE 1: Wavefront numbers the vertices 1, 2, 3... but BINedit starts with vertex 0. And we can add a couple more technical notes : Wavefronts have two file extensions: *.OBJ &.*.WRL. Both are compatible with Binedit. All that needs to be done with a .wrl file extension is manually change it to .obj. BinEdit does not support texture mapping for wavefronts. This means that if you import a wavefront into BinEdit, you will need to map textures to it; and, if you export a model as a wavefront, you will lose any texture mapping you have done. Therefore, be sure to save as a bin model too. When you open a wavefront into BinEdit, it will automatically be enlarged to an extreme degree. It is not uncommon for a model to be adjusted to well above 100,000,000 editor units (390,000 feet) in size along the largest axis. This means you may need to use View>Zoom to fit from the menu just to see the model in the BinEdit window, and you will probably want to resize the model (keeping proportions) to a more reasonable and workable size (22 feet?) before you do anything else to it. Now, if you are using other 3D programs to create your models, then it is probably not necessary to go into the particulars of wavefront files. After all, the programs will take care of the calculations for you. However, if you follow Oliver Pieper's suggestion and "define your model shapes off line" then a quick peak at a couple examples will help clarify what we've been talking about. Continuing with our Zephouse example, the following is the wavefront file:
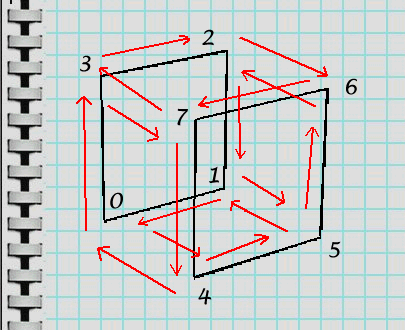
Notice the lines that begin with the letter "v" define verticies, and lines that begin with the letter "f" define faces. The numbers beside the verticies are the x,y,z values of the three dimensional space, and the numbers beside the faces are the numbered verticies they are connected to. Verticies and faces start their numbering at the top as number 1 and proceed in chronological order as you come down the list. Oliver Pieper suggests this is "easier than using the menu commands to add each vertex and face" and we are inclined to believe him for simple models like our Zephouse. Recall our diagram:
When we have calculated the vertex positions and face definitions as we have done, it is just as easy, or easier, to list them in a text file saved with an obj extension than it is to manually enter the numbers into the prompt boxes from the BinEdit menu. The barrel wavefront, that is included in the BinEdit download zip, looks like this:
At first glance this may seem a bit intimidating, but on further inspection we recognize that the verticies and faces are defined in exactly the same way as the Zephouse. Quite naturally, a ten-sided cylinder will have many more verticies and faces than a simple box, but if you're handy with geometry and a table of values, the prospect of creating a slightly more complex model shouldn't bother you at all.
Finally, jumping ahead, we come to one of the most complex of all mtm2 creations: a truck.
The stock Bigfoot, for example, has 236 verticies and 248 faces. For your convenience, I have used BinEdit's export option to create a wavefront for Bigfoot - so that you can see what a very complex file would look like. Please click here to view the Bigfoot wavefront in a pop-up window. Now maybe I'm wrong, but I don't think I'm alone in thinking that creating something this complex by a manual wavefront method is a pretty scary idea, if not nearly impossible. It seems obvious to me that someplace between our Zephouse box and a five hundred line model, there is a point at which it is best to view the work in progress - as it is being created. Of course, where that point is depends on you and how comfortable you are in envisioning 3D space. Either way, there you have it. That is how wavefront files work and some ideas about how you can make them work for you. |