|
| |||||||||||||||||||||||||||||||||||||||
|
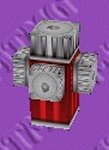
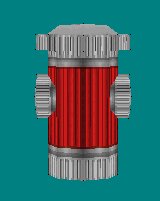
(TireMaker & Tutorial) TireMaker 1.1 by Bin-Masta is a small and moderately easy to use freeware program that allows you to create round Models (not just tires) for use in MTM1/2. TireMaker is a DOS based program. Whether or not you're comfortable getting around in DOS, the readme.txt file included in the download zip is informative enough that you should be able to get through whatever you might need to do. If you haven't read it, please do so now before continuing. While I will review some of that information, I do not intend simply to repeat it here. Instead, I'll be showing you how to use TireMaker and BinEdit together in order to create interesting models. For my example, I'll show how I re-created the mtm1 boxy fire hydrant into a much more satisfying roundish fire plug.
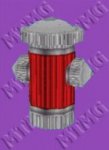
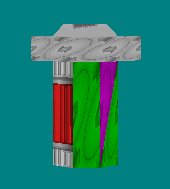
Design One of the best features of TireMaker is that it will calculate the location of all the verticies in a circle, and it will do it with precion every time. However, because it is a DOS program that creates OBJ files, the unfortunate part of it is that you cannot watch the circle as it is being formed; you cannot stop in the middle and change things on the fly. Therefore, it is important to be able to visualize what you want to do before you do it. In short, before you create something using TireMaker, you need to make a plan. For our hydrant, we will need two round parts that will be inserted one into the other after they have been mapped to textures. For example, like this:
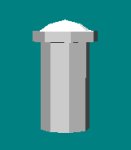
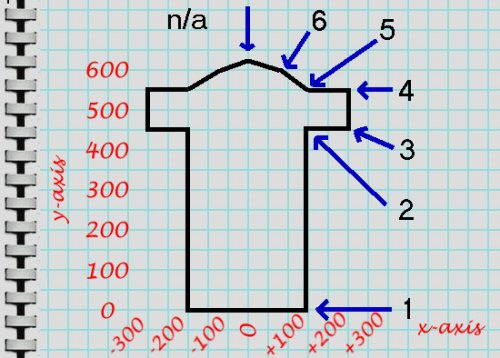
Determining Values Review: TireMaker will ask us which axis the model will be centered on, how many circles it will have, their position and radius, and the number of verticies we want for the model's circles (i.e., how many sides it will have). For us, both shapes are basic cyllanders but the upright section has a few extra details that we'll need to think about, so let's start there. First part Make a sketch, preferrably on graph paper.
Right away, several things jump out at us: This part of the model is centered along the y-axis, it will have six circles, and as long as the scale you use is consistence in both directions, the position and radius become visibly calculable.
The only thing that remains is to decide on the number of sides we want to use. Obviously, we need more than the four that made up the original mtm1 fire hydrant. Six will be an improvement, but the hydrant will still appear squared. We will use eight. It is possible to use more, but we want to be vertex and face conscious because of the negative effect too many can have in the game. Second part Again make a sketch.
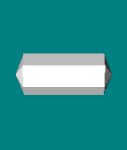
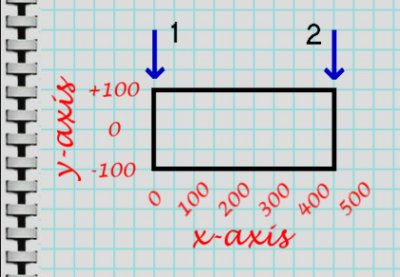
This is an ordinary cylander centered along the x-axis. It will need two circles only.
The number of sides this part will have should also probably be eight. However, since the majority of this will be hidden "inside" the upright part and only the ends (the coupling parts) will be exposed, we can get away with six sides. Create the model Go ahead and make the model according to the instructions in the TireMaker readme.txt file. If you think it would be helpful, you may view the steps used to create the upright and cross parts that we have described. BinEdit Import and size Import the upright.obj file into BinEdit (Files>Import Wavefront). You will need to load a texture first (Textures>Load). Hytop.raw (from the mtm1 hydrant) will work fine for us. Very likely, you will not see the model right away, and even if you do it will not look perfect yet. To fix this:
- goto View>Zoom to fit. It should now be in view. - check the "keep proportions" box- goto View>Zoom to fit. It should be in view again. - you may resize again as many times as you need (keeping proportions and/or not keeping proportions) until it's the shape and size you want. Mapping top and bottom - goto Face>Select By Facing - select "Y Axis"The top will turn green. - goto Groups>Map Face Group to Texture - find Hytop.raw- goto Face>Deselect All Faces Repeat for the bottom using the "negative Y Axis" in Faces>Select By Facing. You will be able to leave "or up to ? degrees away" at zero. Mapping sides You will have to map the sides face by face. Load the Hysidea.raw texture. Cycle through the faces using the space bar, and select the faces using the "F" key. You can probably do four faces at a time for this example. For instance:
It is probably easiest to map the rim of the upper part separately from the lower sides. However, if you don't mind cycling through the faces back and forth, this can be done all at once if you prefer. Save often. You may use any temporary name you want since this will not be the finished model. Clear the work area when you are done. The cross part Import the cross.obj file into BinEdit. Repeat the centering, resizing (3 to 4 feet wide), and mapping procedures you used on the upright.obj. This should be much easier since it's a simpler model. You should end up with something like this:
Prepare to merge the two models With the cross part still in BinEdit,
- goto Vertex>Select All Vertces You will not always need this step. Sometimes, the models will insert correctly with everything centered. However, storing groups is a good habit to get into. Insert With the cross part still in BinEdit,
- goto File>Insert If the two model parts line up the way you want them to, save using a unique name that you can use in the game. If they do not line up perfectly, goto Groups>Restore Vertex Group, then goto Models>Translate and move the part to the spot you want. Now save. Final touch ups Notice, the ends of the cross part and the top of the hydrant are rather flat.
Use the tab key to cycle through the verticies until you are on the center vertex for one of the ends. Now use the x, y or z keys (shift + x, etc to reverse the direction) to nudge the end outward. You shouldn't need much.
Repeat for all three end spots. That's it, you're done. Save. Double check
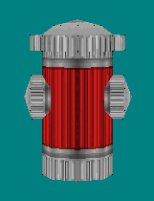
- Model>Center All That's it. You're ready to roll.
You may use TireMaker to create any round model you might need. And it can be as simple or complex as you require. Best of all, you can use BinEdit to import and merge your round creations to be used in even more complex models. Let your imagination run wild. |