BINedit Complex 2D Models
Complex 2D Models
(Designing)
What I mean by "complex" is a simple 2D model that is not a triangle
or square. That is, a 2D model that has more than one face.
For the purpose of demonstrating this idea, we will make a stop sign shape
(an octagon).
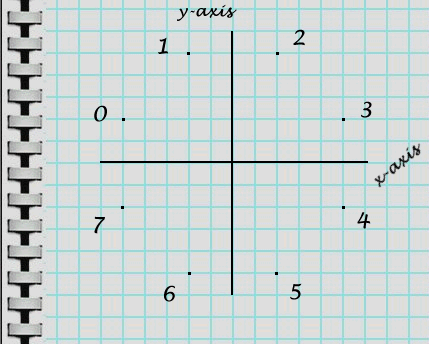
The first thing we will want to do is get out our notebook and plot
where our vertex points will go. Like this:
|
Note 1 : a normal stop sign is not very complicated
and the location for vertex points can be figured out by sight (i.e., just
by looking at it). If you want something more circular, or something
less symmetrical, then you may want to get more mathematical with your calculations.
Either that or use the hit or miss, trial and error method. The bottom
line here is you should use whatever method you feel most comfortable with,
or achieves the best results.
|
|
Note 2 : we will use the same scale that we used
in the simple 2D exercise. That is, 1 graph paper square = 100 editor units.
|
So, in editor units, our vertex coordinates (x,y,z) will be as follows:
Vertex 0 = (-500,200,0)
Vertex 1 = (-200,500,0)
Vertex 2 = (200,500,0)
Vertex 3 = (500,200,0)
Vertex 4 = (500,-200,0)
Vertex 5 = (200,-500,0)
Vertex 6 = (-200,-500,0)
Vertex 7 = (-500,-200,0)
|
Reminder: all points above the x-axis are positive,
all point below are negative, and all points to the right of the y-axis
are positive, all points to the left of it are negative.
|
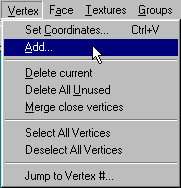
Okay, now it's time for a little chug and plug. Goto Vertex>Add:
The "add vertices" box will come up.
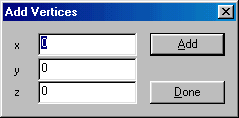
Note : I will not continue displaying
function boxes that we have seen many times already. Doing so would
only try your patience and it would bore me. So, for the last time,
this is what I mean when I refer to the "add vertices" box.
|
Plug in the vertex coordinates, clicking Add after each one. When you are finished, click Done.
The verticies for our stop sign shape are now in and ready for us to add faces to them.
Save your work.
|