Lesson C - Making the course.
We need to specify the "main" course (used in the game for the map),
and also a course for the computer trucks to follow.
You can close the TexturesBox now if you want.
15 Start the main course. In the toolbar, click the "Edit Course" button.
You should then see a new side panel - in there, make sure "Main (0)" is selected.
Move the mouse to near the bottom of the first straight, then right-click and select
"Insert Segment" from the popup menu. Move the mouse over to where you see the
white "0" and it should highlight in a green circle. Move to the right and it should
highlight in a red circle - left-click on the red circle and drag the mouse
(keep button depressed) to move the red circle up to the end of the first straight.
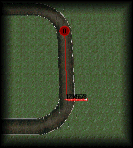
Now when you move the mouse away, the white "0" should be in its original position
(indicating that this is where the course starts). Those other objects near the
segment start represent the starting positions for trucks - we will deal with those later.
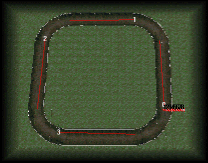
16 Complete the main course. To add additional segments, you need to right-click
on the end of an existing one (so it highlights in a red circle) and select
"Insert Segment" from the popup menu. Do this to create segment "1", and then
drag both ends of the new segment so it spans the second straight. When you are
dragging, the start of the segment is shown green, and the end in red - make sure
you have it the correct way around!
Repeat this by inserting a new segment from the end of "1", and then once again
from the end of that one.
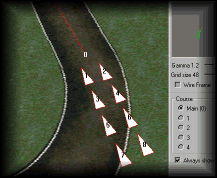
17 Set the truck starting positions. For this, use "Z" to zoom back down closer to the
ground, and use the arrow keys so the truck positions are in clear view.
When you move the mouse over the triangles, they will highlight in green. Drag them with
the mouse to form two rows in line with course segment "0".
You also need to right-click them and select "Properties" from the popup-menu and set
the "Angle" value to 0 (zero).
18 Make course for computer trucks to follow. The computer trucks in MTM2 always follow
course #2, so we need to make sure thats defined. Select Course 2 in the side panel,
then right-click anywhere on the main display and select "Generate From Main" from the
popup menu. You will now see purple course lines aswell as the red "main"ones. Do the
same for course 1 (not really needed, but Traxx complains if its not done).
19 Save your work! Just click the Save button, or select File/SaveAs... from the main
menu if you want to save it under a different name.
Prev Lesson Next Lesson
Back to Traxx School
Back to Traxx Home Page
The small print
All Software referenced by this site is Copyright by SoftParts and cannot be sold or distributed in any
way other than by SoftParts.
SoftParts accepts no responsibility for any loss, damage or injury incurred as a result of the use of this
software (not that thats going to happen, mind you....)